Today, more training tools are available to personal trainers than ever before. How do you decide what equipment is best? It depends on the situation.
Take resistance training, for example. As far as I’m concerned, free weights reign supreme. Whenever I’m asked about a particular machine, my response is always the same: Get yourself a simple barbell and dumbbell set with an adjustable bench and forget the rest.
However, many trainers face space and budget limitations, making free weights impractical. Fortunately, resistance can come from many sources.
The Pros and Cons of Resistance Tubes and Bands
Resistance tubes and bands are popular in personal training. They are portable, inexpensive, and versatile, allowing for a wide variety of exercises. They also come in different resistance levels, typically color-coded for convenience.
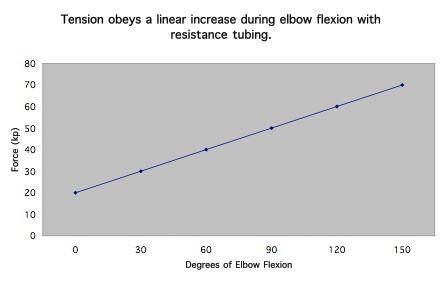
Despite these advantages, there’s a drawback: If one end of an elastic band is fixed, it creates resistance patterns that don’t align with the torque-joint angle curves of the body. Unlike free weights, which follow a bell-shaped ascending-descending resistance curve, elastics increase resistance linearly throughout the range of motion.
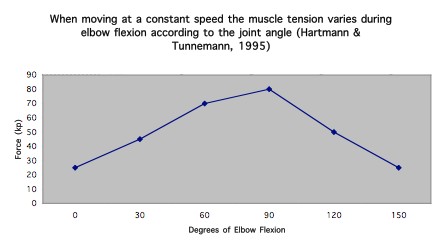
So, why does this matter? Because elastic resistance can cause a disproportionate development of accelerators versus decelerators, potentially leading to injury. A prime example comes from the Canadian national synchronized swim team. Out of 16 cases of rotator cuff tendinitis reported, 15 were resolved simply by eliminating tubing and using dumbbells instead.
In rehabilitation, resistance tubes and bands are often used for rotator cuff training. However, there’s a significant difference between working with dumbbells and elastics.
For instance, when performing shoulder internal and external rotations, dumbbells provide greater overload in the bottom range, while tubes provide greater overload in the top range. To create a more balanced resistance curve, you can:
- Hold both a dumbbell and a tube during a set
- Use a cable machine for more even resistance throughout the movement
However, both approaches have limitations. Many home gyms lack cable machines, and weight stacks typically start at 10 pounds, which may be too heavy for beginners. Additionally, adjusting for individual leverages and fatigue can be challenging.
The Concept of Accommodating Resistance
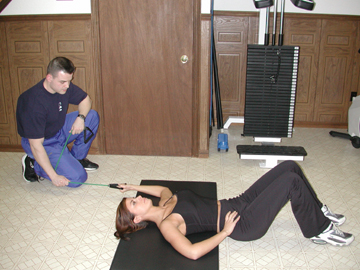
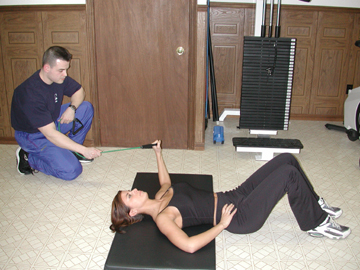
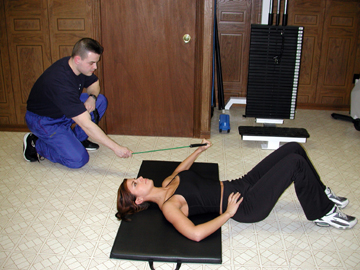
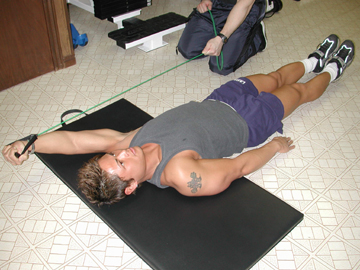
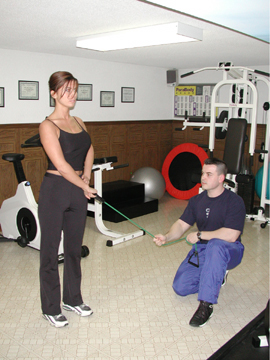
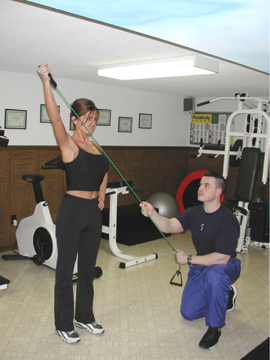
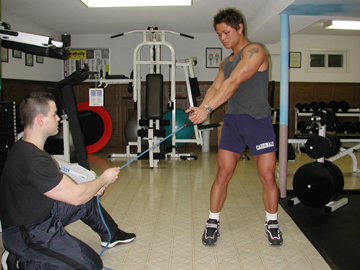
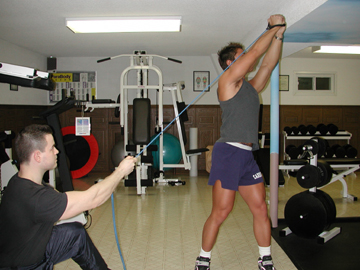
This is where accommodating resistance comes into play. The late Dr. Mel Siff introduced a simple yet effective trick: Have a training partner apply resistance using a tube or band, adjusting tension throughout the movement to match strength fluctuations. This allows for a more even resistance curve and corrects a major flaw in training with elastics.
Pros
- No sophisticated equipment required
- Creates a more even resistance curve
- Allows for better control over time under tension (TUT)
Cons
- Requires a training partner
- Less objective, though this can be mitigated by tracking band size and hand positioning
Isolation Exercises for Shoulder Health
Paul Chek, a holistic health practitioner and neuromuscular therapist, often says: “First isolate, then integrate.” With that in mind, let’s start with some isolation exercises.
Subscapularis Training
Some experts believe the subscapularis is the missing link in unlocking true upper-body strength. However, due to poor posture—particularly rounded shoulders—this muscle often becomes tight and weak.
To strengthen the subscapularis effectively:
- Address tightness through stretching and myofascial release (e.g., Active Release Techniques).
- Train it with resistance once it is in an optimal position.
Infraspinatus Training
Unlike the subscapularis, the infraspinatus (an external rotator of the humerus) is typically long and weak. This imbalance is often due to strength training programs that neglect external rotation.
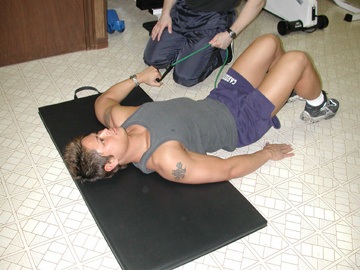
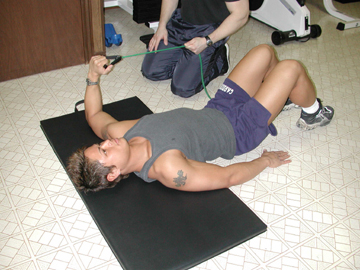
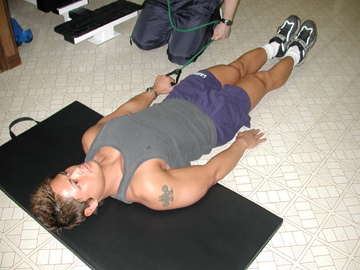
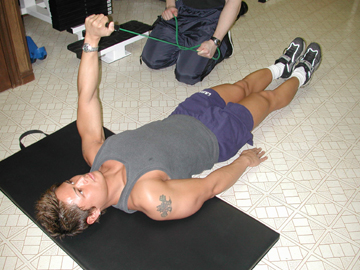
European physical therapist Robert Lardner suggests an interesting adjustment for rotator cuff training: Instead of gripping a dumbbell, which engages the flexor muscles, try performing these exercises with an open hand while strapping resistance to the wrist. This approach may help better target the rotator cuff.
Proper Execution of the Pullover Exercise
Many trainers prescribe pullovers to correct winged scapulae, but this is misguided. To fix the issue, you should strengthen the serratus anterior, rhomboids, and middle/lower trapezius—not the latissimus dorsi and subscapularis, which can contribute to the problem.
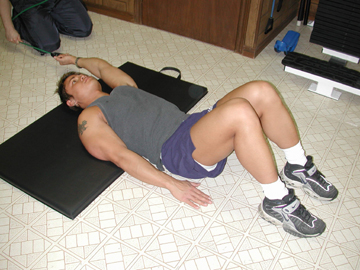
Additionally, the standard dumbbell pullover performed over a bench increases the risk of abdominal hernias and shoulder strain. A safer alternative is to perform the exercise on a decline bench or on the floor, reducing stress on the shoulders. Keep your core engaged and avoid excessive back arching.
Safer variations:
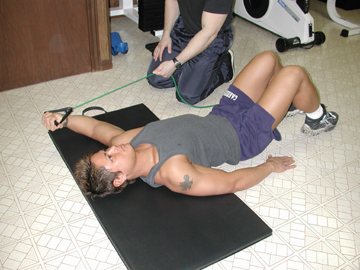
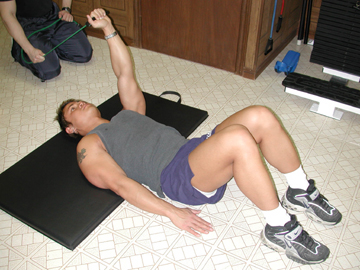
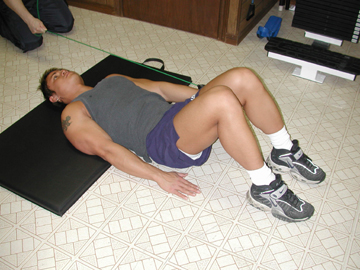
- Supine shoulder flexion with tubing
- Supine shoulder extension with tubing
Integration Exercises
Proprioceptive neuromuscular facilitation (PNF) patterns, developed by Herman Kabat and detailed in Knott & Voss, involve spiral movements that cross the midline of the body. These patterns integrate multiple planes of motion:
- Flexion, abduction, and external rotation
- Reverse woodchop
The Bottom Line
By incorporating accommodating resistance with bands and tubes, you can overcome a major drawback of elastic resistance. What was once an inferior training tool can now be a powerful asset in your program.
References
- Chek, P. Program Design: Choosing Reps, Sets, Loads, Tempo, and Rest Periods. Paul Chek Seminars, 1995.
- Korfist, C. Weakest Link Theory. Intensity Magazine, 2002. http://www.intensitymagazine.com/05-14-02/chris_korfist.html
- Poliquin, C. The Poliquin Principles. Napa, CA: Dayton Writers Group, 1997.
- Siff, MC., Verkhoshansky, YV. Supertraining 4th Edition. Denver, CO: Supertraining International, 1999.
From Zero to Two: Leo’s Chin-Up Breakthrough
When Leo began training with me in September 2024, our first goal was to improve body composition — lose fat,
Resistance Training Foundations: How to Progress Safely and Build Real Strength
Resistance training isn’t just for bodybuilders. Whether you’re just starting out, returning after a break, or training for performance, knowing

Neck Extensions Before Arm Curls: Unlock More Strength
When most people warm up for arm curls, they’ll hit a few light sets or maybe stretch out a bit.